If you find unwanted objects in your photo, what can you do ?
If you are still in that place and can retake, the best choice to fix it is to take it again.
In some cases, you can return to that place to retake it. In many cases, althought you can return to that place, you cannot retake because
it is a photo of event, not a photo of place. Retouch photo to erase unwated objects is an alternative to fix it.
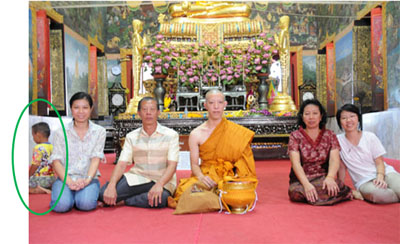 | |
Before retouch to erase a boy.
This family is composed of 5 persons. They took a photo of ordination. A boy in green circle is not a person of this family.
The boy in photo is an unwanted object. However, they cannot retake it because they found this mistake a few days later.
|
| 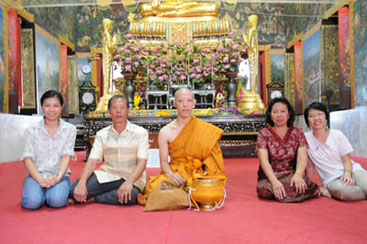 | |
After retouch to erase a boy.
They can retouch the photo to erase a boy, an unwanted object.
This article presents how to erase unwanted objects using photoshop.
|
Learn English vocabulary by pictures
Pictures are more attractive than alphabets. Matching pictures with words is a technique to memorize vocabulary rapidly.
More than 700 words match with pictures. They are used to play matching games.
The more games you play, the more vocabulary you memorize.
...Click here for more detail...

To memorize and recall vocabulary is a key factor of success for learning foreign language. Keeping your vocabulary in online database and use it to play games.
The more games you play, the more vocabulary you memorize. Vocabulary online supports any language.
...Click here for more detail...
Brain Training

Empower your kid's brain by brain training.
...Click here for more detail...
|
| |
Steps to erase unwanted objects from photo
Step 1 : Select a photo to retouch
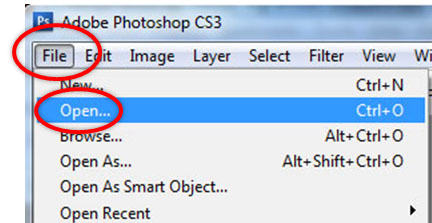 | |
start Photoshop.
Click File and Open
then select a file of picture.
|
Step 2 : Copy layer1
To retouch a photo need both technique and skill. Do not retouch the original photo because it may be damaged.
Copy the original image to another layer to retouch. If the retouched image is not good enough, delete it and repeat the process until your skill
is improved.
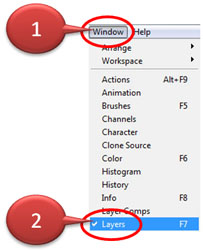 | |
Open layer window
Detail of layer is shown in layer window.
If you do not see layer window, you have to open it.
Click Windows (step no 1)
and Layers (step no 2)
|
 | |
layer window
The original image is in the lowest layer named 'Background'
|
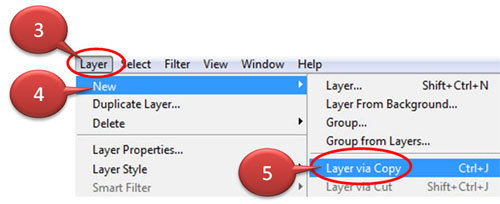
Copy the original image to another layer. Clike Layer (step no 3), New (step no 4) and
Layer via Copy (step no 5)
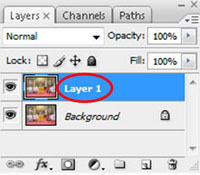 | |
Image is copied to upper layer named 'layer1'.
|
Step 3 : Retouch image in layer 1
Click image of layer1 in layer window to work in layer1.
Layer1 is in blue to show that you are working in layer1.
| |
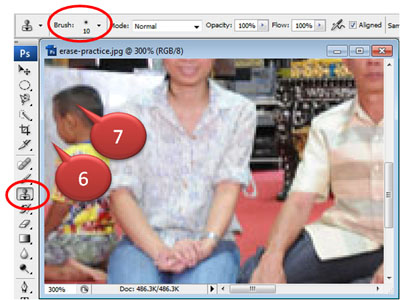
Erase a boy in green circle
Using  Clone Stamp. Clone Stamp.
You need 'zoom In' and 'zoom out' to work.
Press Ctrl+space bar
and click on image to zoom in.
Press Alt+space bar
and click on image to zoom out.
|
 | |
If there is not a boy,
the area no 7 (image of head)
will be the color of
area no 6 (image of wall).
So the idea to erase the boy is replace the image of the boy (area no 7) with the image of wall (area no 6) using Clone Stamp Tool.
|
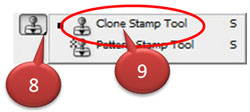 | |
Click (step no 8) to enter menu
and select Clone Stamp Tool (step no 9).
|
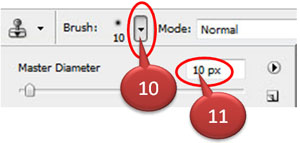 | |
In Brush Option
(on the top of screen)
Adjust the size of brush (step no 10)
to 10 pixels (step no 11).
|
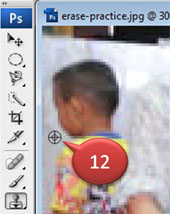 | |
Click on the area that you want to copy (step no 12)
and press Alt of keyboard.
Mouse pointer becomes a cross in a circle (step no 12).
Click mouse while holding Alt of keyboard
to copy a part of image at mouse pointer.
|
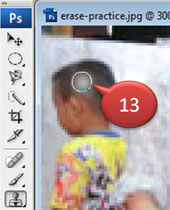 | |
Click at the head (step no 13) to place copied image.
Black color of hair is replaced with gray color of wall.
|
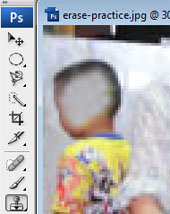 | |
Repeat step no 12 and step no 13
until head is replaced with wall. Finally, the head is erased.
Gray color on the wall is not the same tone.
The upper wall is brighter than the lower wall.
So you have to select an appropriate part of wall to replace the head in order to get a perfect wall after the head disappears.
|
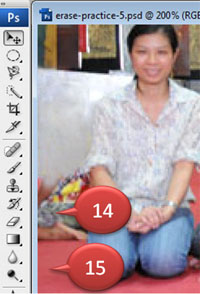 | |
The background is composed of 2 parts.
The upper part is gray wall.
The lower part is red carpet.
So the lower part of the boy (step no14)
must be replaced with red carpet. (step no 15)
Copy image from step no 15
to place on step no 14
in order to delete the lower part of the boy.
Brush diameter may be adjusted
to fit the working area.
|
|
Before erase a boy in green circle
| |
After erase a boy in green circle
|
Step 4 : Save retouched photo
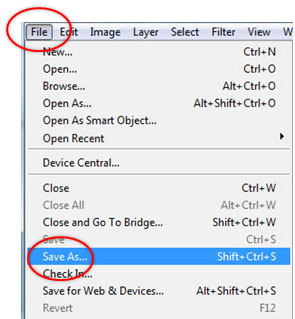 | |
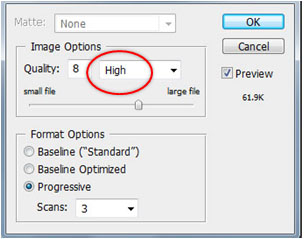
Click File and Save as.
Enter file name and select file type.
File type is JPEG in general.
File name of retouched photo should be different from the original name to make sure that original file is not over written.
Select Quality of High.
|
...Click here to see how to blur background...
| | Viewer 3,990 | Voter 0 | Average Score |
Copyright (C) 2015-2026 All rights reserved.
|